本文简单介绍如何使用 Maven 框架搭建并配置 StringMVC,完成输入 Hello World 的功能。
看本文前最好了解 Maven 和 Spring 基本知识
Maven 创建 Web 项目
1 | mvn archetype:generate -DgroupId=com.wxnacy.spring -DartifactId=SpringMVC-HelloWorld -DarchetypeArtifactId=maven-archetype-webapp -DinteractiveMode=false |
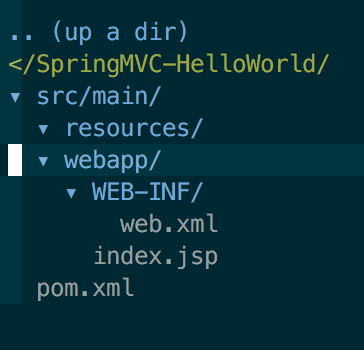
首先使用上述命令创建一个空的 Web 项目,结构如下
创建 Controller 和 View
首先修改 pom.xml 文件,添加 SpringMVC 的依赖以及 Tomcat7 的插件1
2
3
4
5
6
7
8
9
10
11
12
13
14
15
16
17
18
19
20
21
22
23
24
25
26
27
28
29
30
31
32
33
34
35
36
37
38
39
40
41
42
43
44
45
46
47
48
49
50
51
52
53
54
55
56
57
58
59<project xmlns="http://maven.apache.org/POM/4.0.0" xmlns:xsi="http://www.w3.org/2001/XMLSchema-instance"
xsi:schemaLocation="http://maven.apache.org/POM/4.0.0 http://maven.apache.org/maven-v4_0_0.xsd">
<modelVersion>4.0.0</modelVersion>
<groupId>com.wxnacy.spring</groupId>
<artifactId>SpringMVC-HelloWorld</artifactId>
<packaging>war</packaging>
<version>1.0-SNAPSHOT</version>
<name>SpringMVC-HelloWorld Maven Webapp</name>
<url>http://maven.apache.org</url>
<properties>
<spring.version>4.0.1.RELEASE</spring.version>
</properties>
<dependencies>
<!-- Spring dependencies -->
<dependency>
<groupId>org.springframework</groupId>
<artifactId>spring-core</artifactId>
<version>${spring.version}</version>
</dependency>
<dependency>
<groupId>org.springframework</groupId>
<artifactId>spring-web</artifactId>
<version>${spring.version}</version>
</dependency>
<dependency>
<groupId>org.springframework</groupId>
<artifactId>spring-webmvc</artifactId>
<version>${spring.version}</version>
</dependency>
<dependency>
<groupId>junit</groupId>
<artifactId>junit</artifactId>
<version>3.8.1</version>
<scope>test</scope>
</dependency>
</dependencies>
<build>
<finalName>SpringMVC-HelloWorld</finalName>
<plugins>
<plugin>
<groupId>org.apache.tomcat.maven</groupId>
<artifactId>tomcat7-maven-plugin</artifactId>
<version>2.2</version>
<configuration>
<port>8080</port>
<path>/</path>
<uriEncoding>UTF-8</uriEncoding>
<!--<finalName>mgr</finalName>-->
<server>tomcat7</server>
</configuration>
</plugin>
</plugins>
</build>
</project>
接下来创建 Controller1
2$ mkdir -p src/main/java/com/wxnacy/spring/controller
$ touch src/main/java/com/wxnacy/spring/controller/HelloWorldController.java
HelloWorldController.java1
2
3
4
5
6
7
8
9
10
11
12
13
14
15
16
17
18
19
20
21package com.wxnacy.spring.controller;
import org.springframework.stereotype.Controller;
import org.springframework.web.bind.annotation.RequestMapping;
import org.springframework.web.bind.annotation.RequestMethod;
import org.springframework.web.bind.annotation.RequestParam;
import org.springframework.web.servlet.ModelAndView;
public class HelloWorldController {
("/hello")
public ModelAndView helloWorld(
@RequestParam(value = "name", required = false, defaultValue = "World") String name
) {
ModelAndView mv = new ModelAndView("index");
mv.addObject("name", name);
return mv;
}
}
使用注解 @Controller 来定义该类为控制器,@RequestMapping 映射访问地址 /hello 到 helloWorld 方法中,该方法接收一个参数,并返回 Model。
最后创建 View1
2$ mkdir src/main/webapp/WEB-INF/views
$ touch src/main/webapp/WEB-INF/views/index.jsp
index.jsp1
2
3
4
5<html>
<body>
<h2>Hello ${name}!</h2>
</body>
</html>
配置 SpringMVC
原料齐全了,接下来需要将他们关联起来,首先在 xml 文件中配置项目启动时扫描的 Controller 和 View 的目录1
$ touch src/main/resources/dispatcher.xml
dispatcher.xml1
2
3
4
5
6
7
8
9
10
11
12
13
14
15
16
17
18
19
20
21
22
<beans xmlns="http://www.springframework.org/schema/beans"
xmlns:xsi="http://www.w3.org/2001/XMLSchema-instance"
xmlns:context="http://www.springframework.org/schema/context"
xsi:schemaLocation="http://www.springframework.org/schema/beans
http://www.springframework.org/schema/beans/spring-beans-3.0.xsd
http://www.springframework.org/schema/context
http://www.springframework.org/schema/context/spring-context-3.2.xsd">
<context:component-scan base-package="com.wxnacy.spring.controller"/>
<bean
class="org.springframework.web.servlet.view.InternalResourceViewResolver">
<property name="prefix">
<value>/WEB-INF/views/</value>
</property>
<property name="suffix">
<value>.jsp</value>
</property>
</bean>
</beans>
然后在 web.xml 中设置 Servlet,用 / 地址映射刚才的配置文件。1
2
3
4
5
6
7
8
9
10
11
12
13
14
15
16
17
18
19
20
21
22
<web-app xmlns="http://java.sun.com/xml/ns/javaee"
xmlns:xsi="http://www.w3.org/2001/XMLSchema-instance"
xsi:schemaLocation="http://java.sun.com/xml/ns/javaee
http://java.sun.com/xml/ns/javaee/web-app_3_0.xsd"
version="3.0">
<servlet>
<servlet-name>dispatcher</servlet-name>
<servlet-class>org.springframework.web.servlet.DispatcherServlet</servlet-class>
<init-param>
<param-name>contextConfigLocation</param-name>
<param-value>classpath:dispatcher.xml</param-value>
</init-param>
<load-on-startup>1</load-on-startup>
</servlet>
<servlet-mapping>
<servlet-name>dispatcher</servlet-name>
<url-pattern>/</url-pattern>
</servlet-mapping>
<display-name>Archetype Created Web Application</display-name>
</web-app>
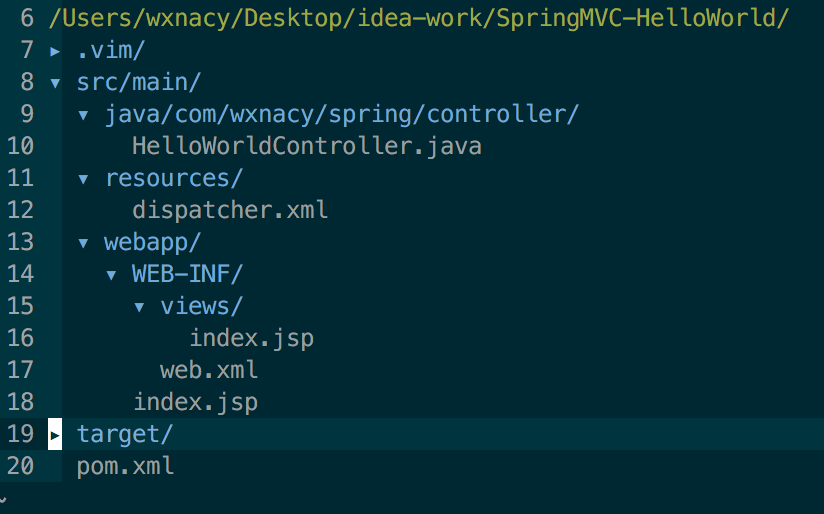
此时项目目录结构为
启动项目1
$ mvn tomcat7:run
此时访问地址 http://localhost:8080/hello 出现如下效果即为成功

本文章的代码已经同步更新到 GitHub 中,可以下载测试使用:https://github.com/wxnacy/SpringMVC-HelloWorld


